Canku Ota


(Many Paths)


An Online Newsletter Celebrating Native America


February 24, 2001 - Issue 30
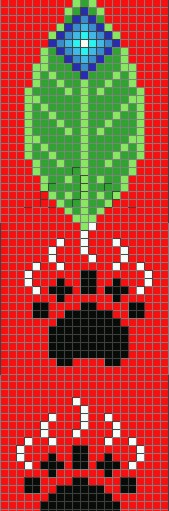


The Beading Series


by Lynne SageFlower Pennington


Over the course of the next several issues, I will be instructing you how to do several beading stitches:

Brick or Comanche stitch, Bead loom:-Warp, Weft, Floating warp, Bead wrapping, Daisy chain, Peyote or Gourd stitch, Two-Needle Gourd stitch, Square or False-Loom stitch, Side Weaving, Embroidery or Appliqué, Backstitch, Rosettes, Double Curve Motif and Huichol .

The Double Curve Motif is mostly done by the American Indians in the Northeast and the Huichol is done by people in Mexico. They are interesting to learn about and try.

Each stitch will have step by step instructions and then a pattern for you to try on your own. At the end of each article I will place web sites and books on the stitch plus sites where you can find patterns.

The first technique I am going to talk about is Loomwork. I am starting out with Loomwork because it is the first beading stitch I learned as a child and the easiest to start with.

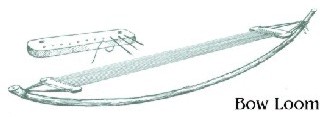
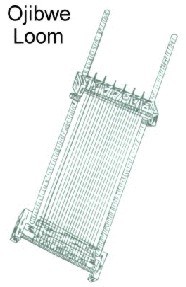
Over the years, the loom has evolved from a single bowed branch used by our ancestors to more sophisticated looms made of metal which can cost up to $300.00. Below are pictures of a bow loom (loom used in the past) and a Ojibwe loom ( the one most used for loomwork today).

Looms made today:
There are many looms on the market. They are made from metals to wood. Their prices range from hundreds of dollars (for metal ones) to less then $10.00 dollars.

Today, most loom work people use wooden looms, called in many bead supplier catalogs as Ojibwe looms or adjustable looms. Most looms lie flat but there are also some that are shaped in an L shape. To me it is a lot easier to work if I am doing wide loomwork to do my looming vertical then horizontal.

Flat looms can be made to extend to several lengths and widths from 6 inches in length by 4 inches wide to 45 inches in length by 12 inches wide. The 45 inch one comes in handy when working on beaded strips for the sides of pants and the shoulders of shirts or jackets. The smaller one is great for making loomed pieces for pouches.

If you are going to purchase a loom from a Craft suppler I suggest purchasing it from Crazy Crows Trading Post. He offers excellent wooden looms for a good price. I will place his web site link on the end of this article.

There are many ways to make your own loom from wood from easy ones to more complex ones. They are really not hard to make and if you have a crafty parent then maybe if you ask them they will make one for you.

I do have instructions on making different ones from using a strong box to wood ones, if you are interested email me at WtSageflower@ aol.com.

My dad made some adjustments to my first Ojibwe loom before he started making them for me. They may be helpful to you also. He smoothed down the notched in the top on the end board and screwed in machine springs. This helped me with keeping my thread strands straight across from each other and from sliding out of the notches.

Note to Parents: My best advise in not to buy the small metal ones from craft stores for your child. Not only will you find that they tend to loosen easy but the rollers often do not fit right in some cases. You end up buying more then one which to me is a waste of money. I purchased one for my daughter to try and she ended up getting frustrated because the loomwork was out of shape and loose. She ended up redoing all her work on a wooden loom.

Terms used in Loomwork:
When you first learn to do loomwork you need to understand the terms they are talking about.

  • Warp Thread- The warp is the threads that are stretched lengthwise on a loom
  • Weft Thread- The weft is the thread that carries the beads and is woven back and forth across the warp to create a beaded design.
  • Floating Warp- The floating warp is the area of warp where the threads are left free and unwoven.
  • Beading Needle- Beading Needles: Long thin needles especially made for beading on a loom. The eye of the needle is determined by the size of the needle and it is best to use beeswax to help put the beading thread thru the eye of the needle. They come in variety of sizes- 10, 12,13. Be sure to have plenty around becausethey tend to break off at the eye.

Materials you need for loomwork:

  • The Loom
  • Spool of Nymo Thread-Size D
  • Beading Needles
  • Beads in several colors ( according to Pattern)
  • Optional: Spool of Thick Cotton Thread ( for outside loom threads)

Instructions on bead looming:
For the purpose these instructions I am using an Ojibwe Loom and this pattern I found on the Patterns Galore
Web site. I have cut the Pattern into 4 sections because when I went to print it out myself from the page it is on, it did not print out the whole pattern. You may want to ask you parent to help you if you need help to copy and paste it, then print the pattern out in a Graphic program.


Finished Project


Top


Middle 1


Middle 2


End


IMPORTANT NOTE: Read all the Important notes on the Instructions before you begin. There are some located at the bottom of the instructions.

Instructions:

  • 1. Before I start to loom I look at my pattern or make up on loom graphic paper the design I want to do. Then I count how many beads I need across and down and write this measurement on a piece of paper. For the pattern above, I also write down the colors that I am going to need. Then gather all the supplies I need. (My loom, Nymo thread, Beading needles and my beads...For the Pattern above: 179 beads down x 21 beads across..Colors for beads- navy, light blue, light turquoise, red black, white, dark green, light green, yellow).
  • 2. Cut the amount to threads you will need about arms length. Do not forget to count the last thread on the outside of you design. Example: The design above calls for 22 pieces if thread. I like to double the thread on the outside edge for more strength so I cut 25 pieces of thread. If you are going to use thick cotton thread on your outside edges then only use one thread on each side you would 2 pieces of Cotton thread then 20 pieces of Nymo thread..
  • 3. Tie several of the threads to each eye hook on one end of your loom, then start separating the thread slipping them thru the cut notches in the top of the wood. I find it easier to use a large needle ( craft needle or small size crochet hook to help separate the
  • 4. Bring the thread over to the direct opposite notch on the other piece of wood and tie threads to the eye hooks on the other end board.
  • 5. At this point check the tightness of your warp threads, if they are to loose you have to tighten them either by sliding the wood on the dowel ( Ojibwe loom) tighten them again.
  • 6. Cut a piece of thread about arms length and thread it onto your needle. Attach it to the left outside edge warp thread with a firm knot. Weave the thread in and out of the warp threads for a few rows about 1/4 inch.. Make sure when you do this you end up on the left side.
  • 7. String the amount of beads you need onto it (21 for the pattern above). Start your pattern from the bottom row which would be red, blue, red, blue, etc From the back side of your warp threads bring the beads up and separate them between the warp threads. You will find it easier if you use your forefinger to keep them in place.
  • 8. Bring the weft thread back thru the beads on the top side of the warp threads. Be sure to keep your needle is on the top side of each bead because if you do not the bead will not be held in place.
  • 9. Continue # 7 and # 8 until you reach the end of the pattern or if you designed your own pattern until the desired length you want.
  • 10. Once you have reached the end of your pattern, weave the weft thread in and out for about 1/4 of an inch and tie off.
  • 11. To insure that my threads will not loosen I use cloth tape on both ends of my beaded strip. Then fold it under when sewing the strip onto a piece of material or buckskin.

Important notes:

  • Continually look at your pattern so that you use the color beads you need. It is a real pain to have to take out a row if you missed a bead of a certain color.
  • When you see you are getting a short thread ( about 4 inches) it is time to add another piece of thread on. Take the needle off your thread and knot the new piece of thread on the end of the thread you are working with, then thread your needle onto your new thread. The knot will pass thru the beads to hide it.


Well, I think I about covered everything and hope you have a good time learning this technique.

Web Links

Loom Graphic Paper
http://www.delinda-v-amura.net/GraphPaper.html#LOOM-11/0


Loom Instructions with graphics
http://www.beadbugle.com/html/sharon_bateman_s_basic_looming.htm


Pattern web sites
Hecuba's Bead graphics
http://varietystore.freeservers.com/bead.html


Loom Weaving Patterns
http://www.beadwork.about.com/cs/patternsloom/index.htm


Craft Suppliers:
Crazy Crow
http://www.crazycrow.com/


Nocbay Craft Supplier
http://www.nocbay.com/


  Canku Ota is a free Newsletter celebrating Native America, its traditions and accomplishments . We do not provide subscriber or visitor names to anyone. Some articles presented in Canku Ota may contain copyright material. We have received appropriate permissions for republishing any articles. Material appearing here is distributed without profit or monetary gain to those who have expressed an interest. This is in accordance with Title 17 U.S.C. section 107.  


Canku Ota is a copyright © 2000, 2001 of Vicki Lockard and Paul Barry.


The "Canku Ota - A Newsletter Celebrating Native America" web site and its design is the

Copyright © 1999, 2000, 2001 of Paul C. Barry.

All Rights Reserved.