|
|
Canku Ota |
|
|
(Many Paths) |
||
|
An Online Newsletter Celebrating Native America |
||
|
September 22, 2001 - Issue 45 |
||
|
|
||
|
Craft Series - Preparing Feathers for Crafts- Part Two |
||
|
by Lynne Sageflower Pennington |
| There are different methods to prepare feathers to use on your projects. Maybe you want to use more than one feather. This issue will deal with the different methods. | ||
| Making Quill loop to use on Bonnets, Bustles, and Roaches. There are Two methods I am going to tell you about. | ||
| Method one: This method requires adult supervision if you are a child. | ||
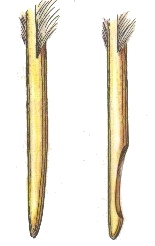
| Step one: Soften the end of the quill in hot water, then cut a canoe type notch. ( shown below) | ||
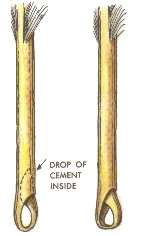
| Step two: Put a drop of cement on the end then tuck the tip up into the quill. Leave a little loop. ( shown below) | ||
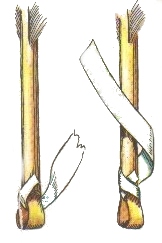
| Step three: Let it dry then anchor a tape strip and wrap it around the quill ( shown below) Do not wrap all the way up because you may want to add a fluff. | ||
|
|
|
|
| Adding on a base fluff: | ||
| Step four: Place the fluff up against the quill and then wrap them together with the remaining anchor tape. | ||
|
|
||
| If you want to add more then one fluff do it before you finish wrapping to the top of the quill shaft | ||
| Adding red felt or flannel | ||
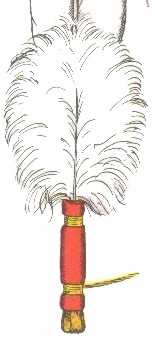
| Step five: Once you have finished putting on the fluff you want you are going to wrap a piece of red felt or flannel around the quill and cement it on. Then wrap a piece of yellow yarn around it. | ||
|
|
||
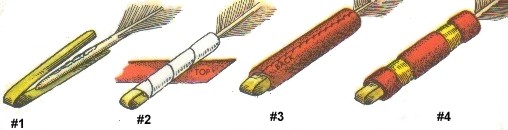
| Method Two: This method is easier for a child | ||
| Step one: Take a ½ inch by 3 ½ inch in length piece of soft leather and cement it to the quill. | ||
| Step two: Then take a 3 inch piece of ½ inch tape strip and wrap it around the leather all the way up to the base of the feather. | ||
| Step three: Then wrap this with a 1 1/4 x 2 1/4 piece of red felt or flannel. Then stitch it closed. | ||
| Step four: Wrap a piece of yellow yarn around the felt. ( shown below) | ||
|
|
||
| Wrapping feathers | ||
| Patterns for the way feather were places depended on the region your tribe is from. To see different styles of wraps and ways to notch feathers go to Native tech the link is in the section below. | ||
| Once the feathers are cleaned there are different ways to decorate the quill besides just wrapping them. I cut off about ½ of the quill removing the point at the bottom. This makes it easier to work with. | ||
| Some different methods to decorate | ||
| 1. Wrap the quill wrap with beads. Make a loom strip about three inches long. The width will depend on what size beads you are using. | ||
| 2. Take a piece of pre-cut fringe about 1 to 2 inches wide depending on the circumference of the quill. The length of the fringe is up to you. I have used from 3 to 12 inches depending on my project. | ||
| 3. Tie a piece of beading thread to the quill and put several beads on it. Now take this and bring it up the shaft of the feather gluing it down as you place if on the shaft. Then gently go between the shaft and the barbs to tie the string. Be careful here so you do not separate the barbs to much. Then take another piece of beading thread and gently go between the barbs here and there to help secure the beads to the shaft. After you have done these step groom your feather to close up any gaps in the barbs. | ||
| 4. You may want to decorate the shaft of the feather with paint. Placing a little dots or lines up the shaft of different colors. | ||
| 5. You can take pieces of leather lacing and glue them to the quill then wrap over them with more lace and add pony beads onto the ends. | ||
| You may want to decorate the tip of the feather | ||
| 1. You can glue a few strands of horse hair then glue a fluff on top on them. Like the picture below | ||
|
. |
||
| 2. You can add a fluff to the top then glue little leather dots on top of the fluff and down the shaft | ||
| These are only a few ways to decorate the quill and tip or the feather. Let your imagination think or other ways. | ||
| The reason I wanted to go over the preparation of feathers is because when we get into the future issues dealing with Dance Regalia you will need feathers to decorate and make some of the regalia. If you have a project in mind for your regalia it is sometimes best to get some of the materials ready beforehand. | ||
| The graphics on this page came from a book published in 1958. The book has not been republished since. Please do not use them on any other sites since they are copyrighted. They are only for personal use. | ||
| In the next Issue I am going to start the Dance Regalia which will expand over several issues. The first part will deal with Quillwork. Another method of decorating regalia personal Items. | ||
|
|
||


| Related Links: | |
|
|
|
|
|
|
|
|
|
|
|
| American Indian Craft Catalogs | |
|
|
http://www.steveeagles.com |
|
|
http://www.ocbtp.com |
|
|
http://www.crazycrow.com |
|
|
|
|
|
||
|
|
||
|
|
||
|
|
||
| Canku Ota is a free Newsletter celebrating Native America, its traditions and accomplishments . We do not provide subscriber or visitor names to anyone. Some articles presented in Canku Ota may contain copyright material. We have received appropriate permissions for republishing any articles. Material appearing here is distributed without profit or monetary gain to those who have expressed an interest. This is in accordance with Title 17 U.S.C. section 107. | ||
|
Canku Ota is a copyright © 2000, 2001 of Vicki Lockard and Paul Barry. |
||
|
|
|
|
|
The "Canku Ota - A Newsletter Celebrating Native America" web site and its design is the |
||
|
Copyright © 1999, 2000, 2001 of Paul C. Barry. |
||
|
All Rights Reserved. |
||