|
|
Canku Ota |
|
|
(Many Paths) |
||
|
An Online Newsletter Celebrating Native America |
||
|
December 1, 2001 - Issue 50 |
||
|
|
||
|
Craft Series - Weaving- Part Two |
||
|
by Lynne Sageflower Pennington |
||
|
Images adapted from Native
Tech drawn by Tara Prindle
|
|
This article is about Finger weaving and Seneca Stick Weaving. After each section I am going to put books and web pages you can go to for more information or to purchase these crafts already done. |
|
|
Finger Weaving
|
|
|
What is finger weaving?
|
|
|
Finger weaving is a technique in which yarn is woven
into designs with your fingers instead of a weaving loom. You will find
when you are weaving you have a warp strand and a weft strand as in
weaving with the loom.
|
|
|
Background of Finger weaving
|
|
|
In the beginning before the Europeans came natives used the hair from animals and plants. They did not have the bright colored yarns we use today. Animals they used the hair from: Buffalo, horses, moose, elk, deer and dogs. They also used their hides in strips. Plants they used: Inner bark from the basswood, cedar, elm tree, dogbane, milkweed, nettle, wormseed, and tamarack root. They would make the bark into strips. If they wanted a different color they would use different plants or minerals to archive the color they wanted. They did not often dye animal hair since they could have different colors by using hair from different parts of their bodies. |
|
|
|
|
|
|
OK
by now you are probably wondering what they made from finger weaving?
|
|
|
They made garters, sashes, armbands, bags, burden straps, and dragging straps. Sashes were often wrapped around the head like turbans in the winter months for warmth. They even used them as bosal bridles for horses. Burden straps were used on packs and cradleboards. Dragging straps were used on horse and dog pulling items such as a travois's, sleds or anything that was used to transports materials. |
|
|
|
|
|
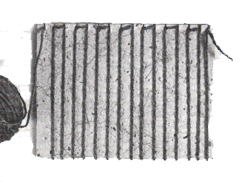
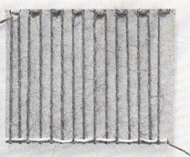
As mentioned in the beginning finger weaving is not done on a loom. It is done by knotting yarn on a dowel or stick, then weaving the yarn back and forth by each strand. Enough yarn would be left on the end for fringe. For a 1 ½ to 2 inch wide band at 24 inches long (garter, armband, burden strap or dragging strap), you would use 20 or more strands of yarn. If you were going to have fringe then you would stop weaving several inches before the end. For a 4 inch wide band (Sash) 140 strands of yarn would be used. Sashes were from 4 to 12 inches wide to 3 to 15 feet in length. Instead of weaving all the way to the end about 36 and 3/4 inches on each end were left for fringe. Always use an even number of yarn strands. |
|
|
|
|
|
You can leave the fringe as it is, braid it or do as I will instruct you in the burden strap instructions. The three designs I am going to instruct you on are diagonal weaving, chevron weaving and how to make a burden strap. |
|
|
Materials:
|
|
|
|
|
|
|
|
|
For a sash you are going to measure the circumference of your waist. Then add 2 yards (fringe on both sides) and 4 inches for the knot. You would follow these measurements for any weaving you are going to do but if you were doing a garter or armband, your fringe would be shorter. |
|
|
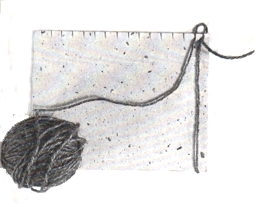
Preparation for Finger weaving
|
|
|
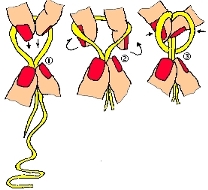
Step one:
|
|
|
|
 |
|
|
Diagram 1
|
|
|
|
|
|
|
|
|
|
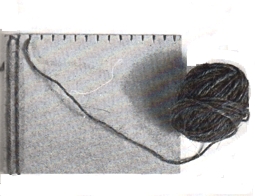
Step Two:
|
|
|
|
 |
|
|
Diagram 2
|
|
|
|
|
|
|
|
|
|
Diagonal Weaving
|
|
|
For the purpose of these instructions I am going to use the colors and number of 10 strands as in the diagrams. |
|
 |
|
|
Diagram 4
|
|
|
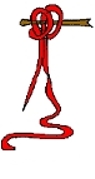
Step 1
|
|
|
|
|
Step 2
|
|
|
|
|
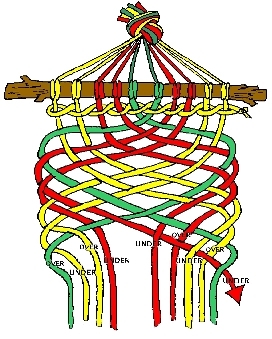
Chevron Weaving
|
|
|
For the purpose of these instructions I am going
to use the colors and number of 10 strands as in the diagram.
|
|
|
Unlike the Diagonal weaving which you work with only
one side. With the chevron weaving you work with both sides starting
with the middle section.
|
|
 |
|
|
Diagram 5
|
|
|
Step 1
|
|
|
|
|
Step 2
|
|
|
|
|
Step 3
|
|
|
|
|
Step 4
|
|
|
|
|
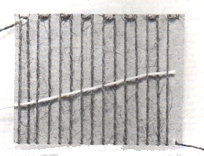
Burden strap
|
|
|
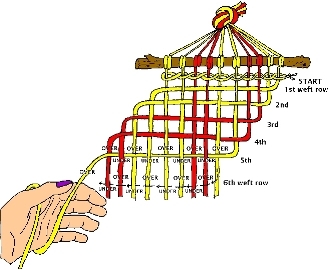
The basic construction for a burden strap is 27 to
30 inches of 2 to 4 inch wide chevron weaving. Then with the fringe
on the ends you do a series of square stitch knots by repeating the
square knot over and over.
|
|
|
On some straps they put a loop on the end of each
end to attach onto what they are going to carry. To do this they would
braid the end. Then using the two strands which they used for the square
knot, them fold the braid end toward the base of where they ended the
square knot and wrap the square knot strands around the braid end and
secure with several knots.
|
|
|
Resource Books and Web sites:
|
|
|
by Esther Warner Dendel |
|
by Alta R. Turner |
|
by Mary Meigs Atwater |
|
Instructional Pages for Finger weaving |
|
|
|
|
|
|
|
|
|
|
|
Sites
to Purchase finished finger weaving items
|
|
|
|
|
|
|
|
|
|
|
|
|
|
|
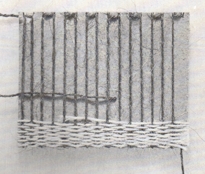
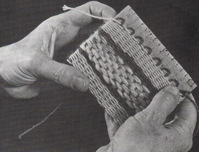
Seneca Weaving
Sticks
|
|
|
What are Seneca Weaving sticks?
|
|
|
Seneca Weaving sticks are a set of eight sticks used as the base to weave on. They can be made in two different lengths. Each stick has a hole in the bottom in which to bring a piece of yarn through. They are waxed to ensure smooth weaving. I made a set of these out of ¼ x 12" dowels. I took a small bit and drilled a hole ½ in up from one end and then whittled a point ( like on a pencil end) and sanded the tip down so it would not be sharp. I also sanded the end in which I cut the length form a 36" dowel so it was smooth. |
|
|
How is the weaving done? |
|
|
Materials: |
|
|
Yarn ( in different colors if you want) |
|
|
weaving sticks |
|
|
Instructions |
|
|
Step one |
|
|
|
|
Step Two |
|
|
|
|
Step Three |
|
|
|
|
Step Four |
|
|
|
|
Step Five |
|
|
|
|
Resource Web Site |
|
|
|
|
How to make a Cardboard Loom |
|
|
Materials to make a cardboard loom |
|
|
|
|
|
Yarn for the Warp |
|
Yarn for the Weft ( several colors if you want) |
|
A Ruler, wide tooth comb and scissors |
|
| Step one | |
On your cardboard make a series of makes on the width ¼ inch apart. After this is done take your scissors and make 1/8" notches on these marks. |
|
| Step two | |
Take one of your yarns leaving about a six inch tail and Put it in the first notch, then turn the cardboard over and bring the yarn up and into the second notch. Repeat this procedure until you reach the end notch. The end should be on the bottom |
|
 |
 |
|
Diagram 1
|
Diagram 2
|
 |
 |
|
Diagram 3
|
Diagram 4
|
| Step three | |
|
|
 |
 |
|
Diagram 5
|
Diagram 6
|
 |
|
|
Diagram 7
|
|
| Step four | |
Now turn the cardboard loom over. If your last warp thread you wove was under, you want to start this one under or visa versa. |
|
| Step Five | |
Continue to do Steps Three and four until you want to add another color yarn. Start your new yarn as in diagram 9. |
|
 |
|
|
Diagram 9
|
|
| Step Five | |
When you reach the top of your cardboard loom you are finished. To end it, slip the warps at the top of your loom out of their notches and slid you finish project down off the cardboard. |
|
 |
|
|
Diagram 10
|
|
| Try this with several different size cardboard and different texture yarns. I made a coin purse and small evening bag out of yarn with sparkle yarn using this technique. | |
| Resource Book for Cardboard Loom | |
Spiders' Games-A Book For Beginning Weavers |
by Phylis Morrison |
| Well this is the end of the Weaving articles. As for the next article you will just have to wait and see. It will be a surprise. | |
|
|
|
|
|
||
| Our ged programs and ccdp test made with using high quality grade materials can be easily notified with its appearance and serve for number of years and online ged test too here. The outstanding and amazing cissp blend smart technology, performance and style in it. We help to ensure updated toefl practice. | ||
|
|
||
|
|
||
|
|
||
|
|
||
| Canku Ota is a free Newsletter celebrating Native America, its traditions and accomplishments . We do not provide subscriber or visitor names to anyone. Some articles presented in Canku Ota may contain copyright material. We have received appropriate permissions for republishing any articles. Material appearing here is distributed without profit or monetary gain to those who have expressed an interest. This is in accordance with Title 17 U.S.C. section 107. | ||
|
Canku Ota is a copyright © 2000, 2001 of Vicki Lockard and Paul Barry. |
||
|
|
|
|
|
The "Canku Ota - A Newsletter Celebrating Native America" web site and its design is the |
||
|
Copyright © 1999, 2000, 2001 of Paul C. Barry. |
||
|
All Rights Reserved. |
||