Canku Ota Logo

Canku Ota

Canku Ota Logo

(Many Paths)

An Online Newsletter Celebrating Native America


December 15, 2001 - Issue 51


pictograph divider


Craft Series - Ribbonwork - Part Two


by Lynne Sageflower Pennington


In the Last Ribbonwork article I went over: What is Ribbonwork, Terms used in Ribbonwork, What kind of ribbons are used today, Making Ribbons using material, What fabric to use and The important aspects of ribbonwork.

In this article I am going to talk about the different styles of ribbonwork, I am going to give examples of how to prepare your ribbons for the technique, you can experiment with it like I did before I attempted a big project. I am also going show you some templates you can use, I have added color to the templates so you can see the negative-positive affect.

The three appliqué Ribbonwork techniques I am going to talk about are Plains Ribbonwork, Osage ribbonwork and Woodland ribbonwork. The Plains and Osage Style Ribbonwork are mostly the same style only the how the ribbon is put on the material is different. This is explained below.

Plains Style Ribbonwork:
Plains style ribbonwork mainly consists of geometric and zigzag designs. With this technique you can create peaks and valleys by overlapping several ribbons. It is all hand sewn and takes time to do.

When doing this style you may find it helpful to use a cardboard templates to help with shaping your ribbons. I use card weigh paper that I use for making cards.

Osage Style Ribbonwork:
Osage style ribbonwork is mainly straight geometric designs. The ribbons are sewn on by machine. The stitching is done very close to the edge of the top ribbon. When sewing the ribbons on, the needle of the machine is pivoted so that the whole strip is sewn down.

Before I get into Woodland Style Ribbonwork let me give you an example on how to prepare your ribbons to do this technique. I am going to use a diamond design. You will be working with the top ribbons. I used material instead of ribbons since I could not find ribbons 3 inches wide:

Materials:
2
1/4 yard pieces of cotton material - one green and one red - for my top design. I cut the material 3 inches wide
2
1/4 yard pieces of cotton material cut 3 inches wide - blue - for the bottom layer.
 
Ruler
 
pencil or disappearing marking pen or pencil
 
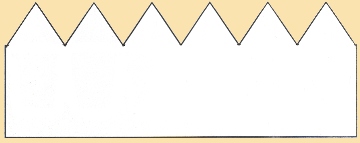
Cardboard template-half diamond shapes cut all the way down it ( pictured below)

Half Diamond Template

1.
Take the red top ribbon and lay it on the table
2.
With your marking pen tip put dots every inch -5/8 inches in from the edge.
3.
Now carefully with your scissors cut up to the dot from the edge of the material. Make sure you do not cut higher then the dot.
4.
Now take the template and place it on the ribbons, the dots lining up with the down point of the half diamond.
5.
Now take your iron and press down the slash on each side to the template to form a half diamond. I use a tiny, tiny drop of glue between the edge I turned over and the base of the ribbon to hold the shape of the diamond.
6.
Now take the green ribbon and do the same process (steps 1 through 5).
7.
Sew down your bottom ribbon - blue - on your bottom material. You should have a seam line in the middle of the bottom ribbons.
8.
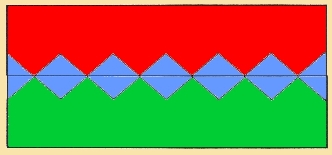
Take one of the top ribbons and place the points of the diamonds on the seam line. Then take the other ribbon and put the points directly across from those points. This forms a big diamond

Diamond Pattern

When working on a big project like putting ribbonwork on a skirt, you can go around the rough edges of your bottom ribbon with a finished edge ribbon or other trim to hide the raw edge.
This is an example of layering ribbons

Layering Ribbons


Woodland Style Ribbonwork:
Woodland Style Ribbonwork consists of floral, plant and even some insect designs, The most popular being the butterfly. This technique involves a little more work. Each top ribbon involves more cuts since you are shaping florals, plants or insect.

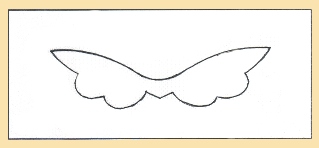
For the example on how to do this technique I am going to use what is called a Butterfly (pictured below). The colors I am going to use are salmon, emerald/blue and ecru. The reason I used these colors is since I am working on my new regalia these are the colors I am using and I wanted to see how it would look. You can use more then three colors if you want to You need to cut template of your design first before start.


Butterfly Template

Materials:
1
3 1/4 x 12 inch piece of peach color material
1
3 1/4 x 12 inch piece of mint green material
2
3 1/4 x 12 inch pieces of tan (ecru) material
Embroidery floss to match the first two material colors
2
pieces of card weight paper
   
Once all 4 pieces of material are cut to the length they are called ribbons
1.
Sew down your bottom ribbons-salmon and emerald/blue
2.
Trace the design of the butterfly in the center of the card weight paper. Then cut out the butterfly. Take care only to cut on the lines because this is your template for your ribbons.
3.
Put the one of the tan (ecru) top ribbons on the table, then place the template about 2 inches from the side edge on the ribbon centering the butterfly in the center of the ribbon. If you want you can do this on an ironing board so you can secure the template to the ribbon with pins.
4.
Now this step is very important. I took my marking pen and put dots 1/4 inch up from the inside of the template following the contour of the butterfly design. Then I connected the dots. The reason I did this is because I did not want to cut too much of the inside material away. (You will understand what I am talking about in the next step.) Now cut away the inside center material above the line you just made connecting the dots.
5.
Now take your marking pen and put dots about every ½ inch along the template edge.
   
6.
From the center cut in on each dot you made. Be careful not to cut beyond the dot. Then fold the material over the edge of the temple and press it down with your iron. You may need to cut a little "V" in some places to help with the curving on the template.
7.
Now move the template down about 2 inches from the tip of the butterfly wing and repeat the process.
8.
Now do the same procedure with the other tan (ecru) ribbon.
   

Once both top ribbons are done, you are going to take each tan (ecru) ribbon and sew one down on top of the mint green ribbon. Then you will take the other tan (ecru) ribbon and when you sew it on top of the peach ribbon, place it in the opposite direction to show a mirror image effect.

After you are all done sewing down the ribbons you want to take embroidery floss and using a chain stitch go around the interior edge of the butterfly to help separate the colors and bring the butterfly out.

I have shown you what it should look like below. I have also done a couple different color variations.


Butterfly Strip

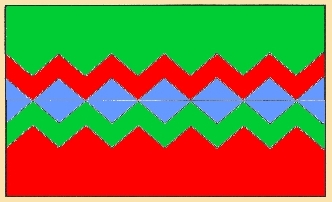
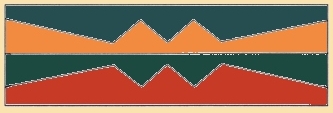
Now, below are some examples of Plains and Osage style designs and also Woodland style designs. I have added color so you can see the mirror images.

Plains and Osage Style Ribbonwork Designs

Split Diamonds Strip

Changing Diamond Widths

Woodland Style Ribbonwork Designs

Floral Strip 1

Floral Strip 2

The two books listed below have several other templates for you to use or make one of your own.

Scarlet Ribbons
by Helen Kelly ( My Ribbonwork Bible very much worth purchasing.)

Symbolic and Decorative Art of the Osage People
by Louis F. Burns- This book has one Chapter on ribbonwork but shows different cut outs.

There is also a video put out by Full Circle Video called "How to Make a Native American Dance  Shawl." This video shows how to do ribbonwork strips plus other things to do to decorate your dance shawl. I put all the Full Circle Videos on my Wish list so cross your fingers for me that I get them for Christmas.

I hope I have given you some information on Ribbonwork. My best advice is to purchase the two books above if there is not someone or a place in your area that teaches this technique. If you are lucky to have a American Indian center around where you live call them and ask if they know of anyone that teaches this technique or a American Indian museum that teaches it.

This is the end of the Ribbonwork series.

pictograph divider


Home PageFront PageArchivesOur AwardsAbout Us

Kid's PageColoring BookCool LinksGuest BookEmail Us


pictograph divider

 
  Canku Ota is a free Newsletter celebrating Native America, its traditions and accomplishments . We do not provide subscriber or visitor names to anyone. Some articles presented in Canku Ota may contain copyright material. We have received appropriate permissions for republishing any articles. Material appearing here is distributed without profit or monetary gain to those who have expressed an interest. This is in accordance with Title 17 U.S.C. section 107.  


Canku Ota is a copyright © 2000, 2001, 2002 of Vicki Lockard and Paul Barry.


Canku Ota Logo


Canku Ota Logo

The "Canku Ota - A Newsletter Celebrating Native America" web site and its design is the

Copyright © 1999, 2000, 2001, 2002 of Paul C. Barry.

All Rights Reserved.


Thank You